HOWTO
Development
Installing Local environment (local SonarQube)
HOWTO build the SonarQube Creedengo plugins
Requirements
-
Docker compose: https://docs.docker.com/compose/install/
-
Java (JDK, and not only JRE, for Sonarqube plugin Development): https://www.java.com/fr/download/manual.jsp
-
Maven for Sonarqube plugin Development: https://maven.apache.org/download.cgi
-
Git: https://git-scm.com/book/en/v2/Getting-Started-Installing-Git
Build the code
You can build the project code by running the following command in the root directory. Maven will download the required dependencies.
./tool_build.shEach plugin is generated in its own <plugin>/target directory, but they are also copied to the lib directory.
Next, check the tests (unit tests and integration tests) are OK:
mvn verifyHOWTO install SonarQube dev environment
Start SonarQube (if first time)
Run the SonarQube + PostgreSQL stack:
./tool_docker-init.shCheck if the containers are up:
docker psYou should see two lines (one for SonarQube and one for PostgreSQL). Please note the assigned port to your local SonarQube (9000 port used for SonarQube server inside Docker container / the other port is the one you can use to access from your web browser).

If there is only postgres, check the logs:
./tool_docker-logs.shIf you have this error on run:
web_1 | [1]: max virtual memory areas vm.max_map_count [65530] is too low, increase to at least [262144]
you can allocate more virtual memory:
# Linux
sudo sysctl -w vm.max_map_count=262144
# Windows
wsl -d docker-desktop
sysctl -w vm.max_map_count=262144
Configuration SonarQube
Purposes: Configure SonarQube to have all Creedengo plugins rules enabled by default.
Change password
-
Go to your SonarQube homepage
http://localhost:XXXX/(XXXX: external docker port used. You can get it when you list available Docker containers). -
Use default credentials:
admin/admin. -
After the first connection, you will be suggested to change
adminpassword.
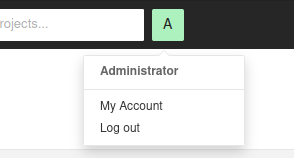
Check plugins installation
-
go to "Administration" tab
-
go to "Marketplace" sub-tab
-
go bottom, and click on "Installed" sub-tab
-
check here if you have Creedengo plugins displayed with a SNAPSHOT version
Generate access token
When you are connected,
-
generate a new token on with "User token" type
-
copy it for following steps

Instead of login+password authentication, this token can now be used as value for sonar.login variable when needed (examples: call sonar scanner to send metrics to SonarQube, on use internal tools…).
Initialize default profiles for creedengo plugins
-
Use the tool
install_profile.shincreedengo-commonrepository (inside directorytools/rules_config).
You can optionally check default configuration of this tool in_config.shfile. -
Launch the following command:
./install_profile.sh <MY_SONAR_PORT> <MY_SONAR_TOKEN>
After this step, all code source for your language will be analyzed with your new Profile (and its activated plugins rules).
HOWTO reinstall SonarQube (if needed)
# first clean all containers and resources used
./tool_docker-clean.sh

# then, build plugins (if not already done)
./tool_build.sh

# then, install from scratch de SonarQube containers and resources
./tool_docker-init.sh
HOWTO start or stop service (already installed)
Once you did the installation a first time (and then you did custom configuration like quality gates, quality profiles…), if you only want to start (or stop properly) existing services:
# start WITH previously created token (to do : change the token inside script)
./tool_start_withtoken.sh

# start without previously created token
./tool_start.sh

# stop the service
./tool_stop.shContribution / concrete development
HOWTO develop in open-source mode
There are two ways to develop in an open-source project:
-
you are an official
maintainer -
you are a
contributor
Maintainer, write permission
If you are an official maintainer identified in the project, you are in a special team with write permissions.
Thus you can:
-
create branches and commit directly inside
-
push code directly on project (by the PR way)
-
review and accept Pull Requests
Contributor, NO write permissions
If you are a new (or regular) contributor, and you don’t have specific write permissions but only read permissions. If you want to contribute to the project, you must use the FORK / Pull Request (PR) system. But don’t worry, if you are a regular contributor, project core-team members evaluates, on a regular basis, some contributors to be maintainers!!!
To contribute with FORK / PR system, you have to:
-
create a fork of the original project (by clicking on Create a new fork button, inside top-right fork menu)
-
check that the new project fork is really present in your personal GitHub projects
-
-
Clone your personal forked project. You can see on GitHub, you have:
-
two new buttons to interact with original project: Contribute and Sync fork;
-
a status information about synchronization between your forked project and original project (on the left of previous new buttons).
-
If your fork is recently created, you can see in the status information that your forked project is synchronized.
-
If not "synchronized", you can click on Sync fork to update your forked project from the original project.
-
-
Create a new local branch to begin development.
-
Once development done, commit and push your work to your GitHub forked project.
-
Once everything is OK, you can create a new Pull Request to original project by clicking on the newly appeared message with Compare & pull request button. A new PR form is displayed and you can fill it.
| When you have already created the PR to the original project, and you improve the branch of your forked project (with new commits), the PR in original project is automatically updated. Please mark this PR as "Draft", meaning you are still working on it (top-right link convert to draft in PR inside original project). |
HOWTO debug a rule (with logs)
-
Add logs like in OptimizeReadFileExceptions class file
-
Build plugin JARs with
tool_build.sh -
Launch local Sonar with
tool_docker_init.sh -
Launch a sonar scanner on an exemple project with
mvn verifycommand (only the first time), followed by:-
if token created:
mvn org.sonarsource.scanner.maven:sonar-maven-plugin:3.9.1.2184:sonar -Dsonar.login=MY_TOKEN -X -
if login and password:
mvn org.sonarsource.scanner.maven:sonar-maven-plugin:3.9.1.2184:sonar -Dsonar.login=MY_LOGIN -Dsonar.password=MY_PASSWORD -X
-
-
Logs will appear in console (debug logs will appear if
-Xoption is given like above).
HOWTO Deprecate an existing rule
If you want to deprecate an existing rule, you have to follow 2 steps as described below.
STEP 1: deprecate rule
This step is done on the next release of the plugin (example: version N).
-
Upgrade the rule implementation to add deprecation information : in plugin repository containing the rule implementation, add a new
@DeprecatedRuleannotation on the rule class -
Upgrade rules documentation:
-
In plugin repository containing the rule implementation, in
rules.adocfile, move rule line from standard rules array to deprecated rules array. -
In
creedengo-rules-specificationrepository, add deprecation to current rule.
-
Thus in next version of plugin, the rule will be still present but displayed as deprecated in SonarQube UI.
STEP 2: remove rule
This step is done on release N+2.
-
Clean implementation code of the rule:
-
In the plugin repository containing the rule implementation:
-
delete the rule’s class, clean all references to the rule;
-
delete the related unit tests
-
-
In the plugin test project repository, clean the rule test classes.
-
-
Upgrade rules documentation: in the plugin repository containing the rule implementation, in
rules.adocfile, mark the rule as deleted.
HOWTO manage license inside code
Documentation of maven plugin "license": https://oss.carbou.me/license-maven-plugin/#goals
-
Check license in code:
mvn license:check -
Update license in code where it isn’t set:
mvn license:format
RELEASING
HOWTO create a release (core-contributor rights needed)
Create a release on DYNAMIC versioning system module
For now, this is ONLY the use case for creedengo-rules-specifications repository.
Why dynamic ?
Because the versioning is dynamic in this repository.
No need to execute both shell scripts (and commits / pushes) in "static" way to manage the versioning.
-
Update
CHANGELOG.adoc: add release notes for next release-
Replace Unreleased title with the new version like
Release X.Y.Zand the date-
… where
X.Y.Zis the new release -
… follow others examples
-
… clean content of current release changelog (delete empty subsections)
-
Respect Keep a Changelog's format
-
-
Add above an empty Unreleased section with subsections (
Added,ChangedandDeleted) -
Add a new section in the list at the bottom of file with the new version.
-
Commit these modifications.
-
-
Update
doc/antora.yml:-
Make sure the
versionattribute is correct. -
Comment the
prereleaseline.
-
-
Update
README.md: upgrade if needed and if version compatibility matrix is described -
Create locally a tag with the previous used version. To do so, execute
git tag <X.Y.Z>. -
Push new tag created previously:
-
locally, go to and update
mainbranch -
execute
git push --tagsto push new previously created tag
-
Create a release on STATIC versioning system module
This is the use case for all plugin repositories except creedengo-rules-specifications repository.
-
IF new wanted release is a major or minor version (
XorYinX.Y.Z)-
THEN modify the old version to the new version in all XML/YML files
-
ELSE no modification needed: the new corrective version (
ZinX.Y.Z) will be automatic
-
-
Update
changelog.adoc: add release notes for next release-
Replace
Unreleasedtitle with the new version likeRelease X.Y.Zand the date-
… where
X.Y.Zis the new release -
… follow others examples
-
… clean content of current release changelog (delete empty subsections)
-
Respect Keep a Changelog's format
-
-
Add above an empty Unreleased section with subsections (
Added,ChangedandDeleted) -
Add a new section in the list at the bottom of file with the new version.
-
Commit these modifications.
-
-
Update
doc/antora.yml:-
Make sure the
versionattribute is correct. -
Comment the
prereleaseline.
-
-
Update
README.md: upgrade if needed and if version compatibility matrix is described -
Prepare locally next release and next snapshot:
-
execute
tool_release_1_prepare.shscript to prepare locally the next release and next SNAPSHOT (creation of 2 new commits and a tag) -
DON’T PUSH, just locally check these 2 commits and tag.
-
-
Create and push new local branch:
-
Execute
tool_release_2_branch.shto create and push a new branch with that release and SNAPSHOT. -
Check on GitHub that this new branch is created and pushed
-
-
Create a new GitHub PR:
-
On GitHub, create a new PR based on this new branch to
mainbranch. -
Check Action launch and result for this new PR.
-
-
Merge PR
-
Merge PR on
mainbranch with the Create a merge commit option. -
Check Action launch and result on
mainbranch
-
-
Push the previously created tag:
-
Locally, go to and update
mainbranch. -
Execute
git push --tagsto push the previously created tag. -
Check Action launch and result on the new tag.
-
HOWTO publish new release on SonarQube Marketplace
New release from scratch
-
Create a fork of SonarSource/sonar-update-center-properties and clone it locally.
-
Create a new branch.
-
Change corresponding plugin metadata file (for
creedengo-java: creedengojava.properties; forcreedengo-php: creedengophp.properties; forcreedengo-python: creedengopython.properties)-
Append the new version to
publicVersionsvalue (comma separated value). -
Add following properties (where
X.X.Xis new release to publish):-
X.X.X.description: a summary of main changes for user for this version. -
X.X.X.sqVersions: supported range version of SonarQube. -
X.X.X.date: Release date of plugin (on GitHub Release page). -
X.X.X.downloadUrl: link to doanwload this specific release. -
X.X.X.changelogUrl: link to detailed change log of this release.
-
-
-
Commit and push modifications on your fork.
-
Create a Pull request for those modifications on SonarSource/sonar-update-center-properties to announce the new release of the corresponding plugin, with:
-
a summary of main changes for user;
-
the download link;
-
the link to detailed release note;
-
the link to SonarCloud corresponding project.
-
New release of existing plugin
-
quite like New release from scratch section above but …
-
Documentation: README.md
-
Example: PR example
HOWTO publish a new version of creedengo-rules-specifications on Maven Central
Requirements
You need write rights to use Maven Central publish process (maintainers or core-team members).
Create a new release of creedengo-rules-specifications repository : please see above HOWTO create a release (core-contributor rights needed).
Why create a new release before?
Because publish process of creedengo-rules-specifications on Maven Central needs a tag on creedengo-rules-specifications repository.
Maven Central publish process
-
Go to Actions tab of
creedengorepository. -
Click on Publish to Maven Central workflow.
-
Click on Run workflow list button
-
Choose a tag version (and not a branch because SNAPSHOT version won’t be published on Maven Central).
-
Click on Run workflow button.
-
Check launched workflow on Actions tab.
-
20 minutes later (because of Maven central internal process), check on Maven central if the new version is published.
CONFIGURATION
HOWTO configure publish process on Maven Central
Requirements: core-contributor rights needed
Update GPG Maven Central keys
What is GPG Maven Central keys ?
GPG system is used to sign JAR files before publishing them to Maven Central.
We have to generate public and private keys, and store them in GitHub Secrets with MAVEN_GPG_PRIVATE_KEY and MAVEN_GPG_PASSPHRASE variables.
These GPG keys are stored in GitHub Secrets available Settings tab of the repository, in Secrets and variables sub-tab, in Actions subsection.
How to install and use GPG? METHOD 1: with "GPG KeyChain" software (MAC OS)
Download and install GPG KeyChain software from GPG Suite. Launch GPG KeyChain software and follow these steps:
-
Create a new key pair by clicking on
Newbutton and fill the form:-
Name: your name
-
Email: your email
-
Passphrase / password: a passphrase to protect your private key
-
Expiration date: never
-
Other options: default values
-
-
Get public key (and private key if needed), by clicking on Export button.
-
You can export public key to a local file (with
.ascextension). -
You can also export private key if option checked in export form.
-
-
Publish your public key to a key server by clicking on Send button.
-
(If you open settings option menu, you can see that key server is
https://keys.openpgp.org.) -
If you face an error when publishing, try another server (e.g. https://keyserver.ubuntu.com/):
-
Insert manually the public key.
-
Then check the key existence with defined email.
-
-
How to install and use GPG? METHOD 2: command line tool
Values are generated on local machine with "gpg" command line tool.
On macOS (for now):
-
brew install gpgto install tool -
gpg --versionto check version of GPG tool -
gpg --gen-keyto generate private and public keys : WARNING, you need to remember passphrase used to generate keys -
gpg --list-keysto list keys (and display expiration date) -
gpg --keyserver keyserver.ubuntu.com --send-keys <MY_PUBLIC_KEY>to send public key to one fo web key servers : MANDATORY to publish on Maven Central -
gpg --keyserver keyserver.ubuntu.com --recv-keys <MY_PUBLIC_KEY>to get public key from keyserver : TO check if our public key is ok and known by keyserver -
gpg --output private.pgp --armor --export-secret-key "<MY_PUBLIC_KEY>"to export private key to a local file
$$ gpg --version

gpg (GnuPG) 2.4.3
libgcrypt 1.10.2
Copyright (C) 2023 g10 Code GmbH
License GNU GPL-3.0-or-later <https://gnu.org/licenses/gpl.html>
This is free software: you are free to change and redistribute it.
There is NO WARRANTY, to the extent permitted by law.

Home: <MY_HOME>/.gnupg
Algorithmes pris en charge :
Clef publique : RSA, ELG, DSA, ECDH, ECDSA, EDDSA
Chiffrement : IDEA, 3DES, CAST5, BLOWFISH, AES, AES192, AES256,
              TWOFISH, CAMELLIA128, CAMELLIA192, CAMELLIA256
Hachage : SHA1, RIPEMD160, SHA256, SHA384, SHA512, SHA224
Compression : Non compressé, ZIP, ZLIB, BZIP2
Why change these variables?
We can check expiration date with gpg --list-keys command.
Current keys are valid until 2026-08-07.
If we want to update these keys, we need to generate new ones and reconfigure GitHub Secrets.
How to generate new values
-
Generate new keys with
gpg --gen-keycommand : we need to give a passphrase (you can give old one) -
Send public key to keyserver with
gpg --keyserver keyserver.ubuntu.com --send-keys <MY_PUBLIC_KEY>command -
Check and get public key from keyserver with
gpg --keyserver keyserver.ubuntu.com --recv-keys <MY_PUBLIC_KEY>command -
Export private key to a local
private.pgpfile withgpg --output private.pgp --armor --export-secret-key "<MY_PUBLIC_KEY>"
Update GitHub Secrets
-
Open exported local file and copy content (only content between
-----BEGIN PGP PRIVATE KEY BLOCK-----and-----END PGP PRIVATE KEY BLOCK-----included) -
Paste this content in
MAVEN_GPG_PRIVATE_KEYvariable in GitHub Secrets on the current repository (Secrets and variables / Actions / Repository secrets) -
Paste the passphrase used in previous step, in
MAVEN_GPG_PASSPHRASEvariable in GitHub Secrets on the current repository (Secrets and variables / Actions / Repository secrets) -
Check below OSSHR token process and then Check publish process with a new release version (see above HOWTO configure publish process on Maven Central)
Update OSSRH token
What is OSSRH token ?
OSSRH_TOKEN and OSSRH_USERNAME are used for communication between GitHub and Sonatype Nexus system for publish process to Maven Central.
Nexus URL : https://s01.oss.sonatype.org/
These variables are stored in GitHub Secrets available Settings tab of creedengo-rules-specifications repository (Secrets and variables / Actions / Repository secrets)
Why change these variables ?
Values are get from a specific Sonatype Nexus account.
Actually, creedengo-rules-specifications Sonatype Nexus account was used to generate values corresponding to OSSRH_TOKEN and OSSRH_USERNAME variables.
If we want use another account, we need to change these values by generating new ones on this new account.
How to generate new values and update GitHub Secrets ?
-
Go to Sonatype Nexus
-
Login with account (ex :
gci) -
Go to
Profiletab -
Go to
User Tokensub-tab present in top list (Summaryvalue is selected by default) -
Click on
Access User Tokenbutton -
New values will be generated and displayed
-
Copy these values and paste them in GitHub Secrets in
creedengo-rules-specificationsrepository, respectively inOSSRH_TOKENvariable (the password) andOSSRH_USERNAMEvariable (the username) -
Check publish process with a new release version (see above HOWTO configure publish process on Maven Central)
-
Check publish process with a new release version (see above HOWTO configure publish process on Maven Central)
CONTACT
HOWTO contact the team
Several ways existing:
-
Go to our website and choose one of different ways:
-
on of our 3 social media (top-right menu).
-
go to Enterprise page and you can fill a contact form: https://green-code-initiative.org/#/entreprise
-
-
Technically: go to our GitHub and create an issue or a discussion
Feedbacks
User Group
A user group has been created to exchange around our plugins.
There is a Slack channel #club-utilisateur on our Slack.
Here are some feedbacks:
Contributor Group
A contributor group has been created for technical exchanges about our plugins. You can participate in the monthly meeting going to '#friday-meet' channel on our Slack.